Configuration
1. Getting Started
To start configuring your Tamarapay OpenCart plugin, Click on the blue ‘pencil icon’.
2. API Configuration Section
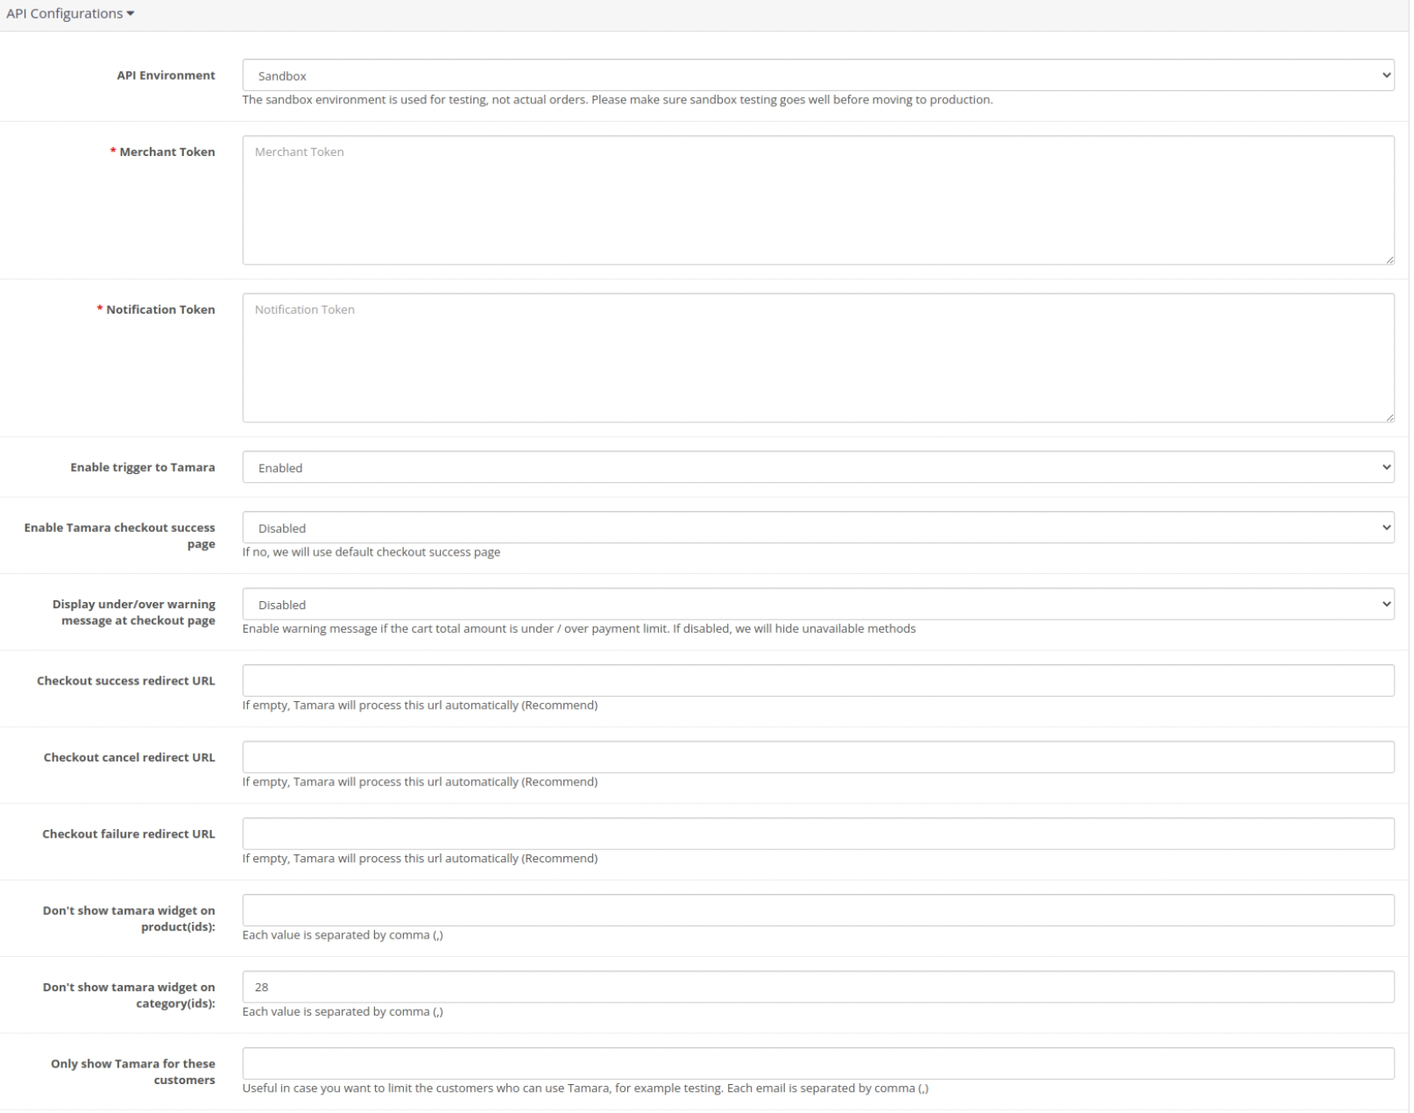
Click to enlarge
- API Environment
- Sandbox: to be used during sandbox testing phase before going live.
- Production: to be used after you receive your live credentials from Tamara so that you can perform live transactions.
- Merchant Token:
- Sandbox: API Bearer Authorization token received from Tamara to be used during sandbox testing phase before going live.
- Production Token: API Bearer Authorization token received from Tamara so that you can perform live transactions.
- Notification Token:
- Sandbox Notification Token: Notification Authorization token received from Tamara to be used during sandbox testing phase before going live to validate notification payload is being sent by Tamara.
- Production Notification Token: Notification Authorization token received from Tamara to validate notification payload is being sent by Tamara.
- Enable trigger to Tamara: If enabled, this option allows you to automatically trigger Capture and Cancel order to Tamara when you perform corresponding action in OpenCart or not. If disabled, you need to integrate with Tamara APIs directly or use Tamara Partners Portal to do so.
- Enable Tamara checkout success page: If enabled, this option allows you to use Tamara template in the checkout page (Only available when point 7. is empty)
- Display under/over warning message at checkout page: If enabled, the extension will display a warning message at the checkout page if the cart total amount is over/under Tamara limits for payment. Otherwise, hide unavailable payment methods.
- Checkout success redirect URL: This option allows you to customise the URL that you want redirect to after the customer’s successful payment with Tamara.
- Checkout cancel redirect URL: This option allows you to customise the URL that you want redirect to after the customer’s canceled payment on Tamara.
- Checkout failure redirect URL: This option allows you to customise the URL that you want redirect to after the customer’s failed payment with Tamara.
- Don’t show Tamara widget on product(ids): This option allows to hide Tamara widget on specific product Ids, also to hide Tamara payment on checkout page if your cart has any of these items.
Each ID is separated by a comma, - Don’t show Tamara widget on category(ids): This option allows to hide Tamara widget on products under specific categories based on their category Ids, also to hide Tamara payment on checkout page if your cart has any of these items.
Each ID is separated by a comma, - Only show Tamara for these customers: The option allows only specific customers to be able to use Tamara. This option is useful when you want to test Tamara checkout and don’t want real customers to use Tamara yet.
Each customer email ID is separated by a comma, - Enable Webhook:
- Yes: If enabled, Tamara will use the webhook to handle the Order Declined and Order Expired scenarios. After a certain time, the order that has been declined or expired from Tamara, will be updated to the status that is set in “Order status when checkout is cancelled” or “Order status when checkout is failure” field under [[Ref. Configuration 4.3]](/docs/opencart-configuration#4-order-status-mapping-section)
- Webhook Id: Your webhook ID; this field will be shown after you enable webhook[13.] and save the configuration.

3. Order Status Mapping Section
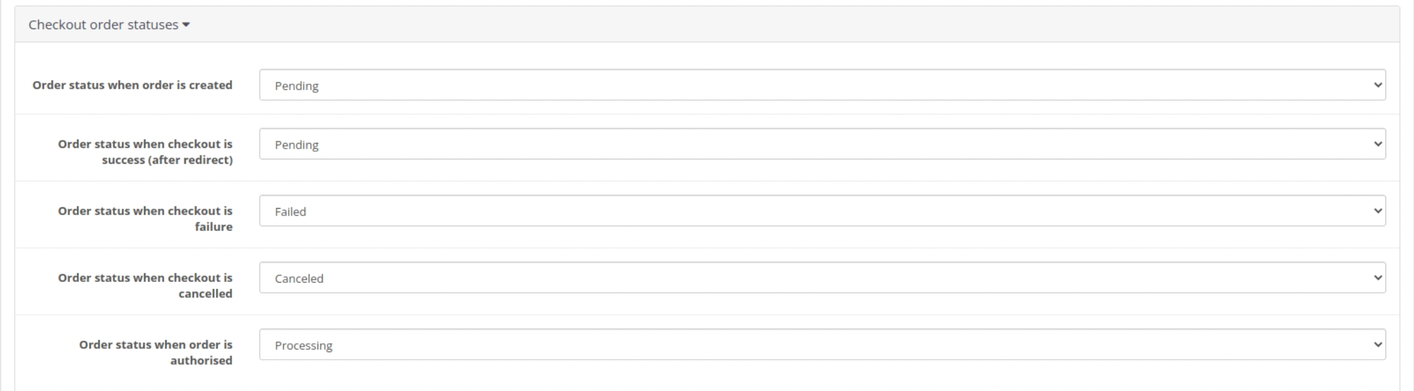
- Order status when order is created: The status that you want to set when the order is created.
- Order status when checkout is a success (after redirect): The status that you want to set when the payment is successful using Tamara.
- Order status when checkout is failure: The status that you want to set when the payment is failed (declined) from Tamara.
- Order status when checkout is canceled: The status that you want to set when payment is canceled on Tamara checkout.
- Order status when order is authorised: The status that you want to set when the 1st payment is successful and authorised successfully from Tamara.
Following are the statuses corresponding to Tamara order status:
| Status | Description |
|---|---|
| Approved | Payment is approved by Tamara and the customer has finished the checkout flow then redirect back to the merchant site. |
| Failed (Declined) | Payment is declined by Tamara. |
| Canceled | Payment is canceled by the customer from Tamara checkout. |
| Authorised | Tamara sends an authorisation callback and gets confirmation from the merchant (OpenCart) successfully. Orders should only be shipped at this state, otherwise tamara will not assume the risk and therefore cannot settle to your account. |
4. Order Status Trigger Section

- Which order status do you want to trigger Tamara capture API (You should set it to the status after the order is shipped): The status that you want the extension to trigger Tamara API to proceed with the Capture payment process. Trigger to Tamara is mandatory in this case. [Ref. Configuration 2.4]
- Which order status do you want to trigger Tamara cancel API? (You should set it to the status when order is canceled): The status that you want the extension to trigger Tamara API to proceed with the Cancel payment process. Trigger to Tamara is mandatory in this case. [Ref. Configuration 2.4]
5. General Configuration Section
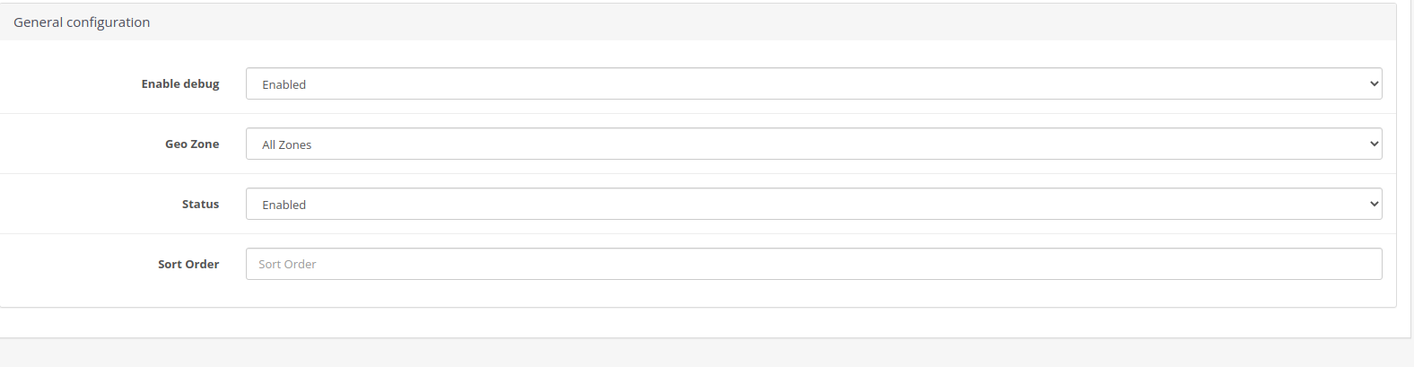
- Enable debug: If enabled, this option allows the module to write logs to file. It is useful to trace if a problem occurs.
- Geo Zone: The shipping zones that are allowed to use Tamara.
- Status: This option is used to enable/disable Tamara on Checkout.
- Sort order: This option is used to sort the order of payment methods on the checkout page.
Updated over 1 year ago
Did this page help you?